
Windows Vista includes a new hard drive encryption feature called BitLocker Drive Encryption. BitLocker can be a very useful security feature for businesses and home users that have sensitive and confidential information stored on their computer. Unfortunately, BitLocker Drive Encryption by default requires a Trusted Platform Module (TPM Chip) version 1.2 or later installed in your computer. A lot of the computers and laptops on the market do not come with TPM chips installed since they are typically only found in premium model business computers. If you have Windows Vista Business, Ultimate or Enterprise but do not have a TPM chip, you can still use BitLocker Drive Encryption.Hidden away in local group policy is a setting that will allow you to turn on the ability to use a USB storage device instead of a TPM key to store the encryption key. This is a great feature for users that don't have the latest high-end hardware because you can still use hard drive encryption. However, every time you turn on your computer, the USB storage device that has the encryption key located on it must be plugged in. Without it, your computer will not boot up. One BitLocker Drive Encryption is setup with a USB storage device, that USB storage device basically becomes the key to your computer.Press the Windows button, type gpedit.msc and press Enter. Navigate through: Computer Policy, Administrative Templates, Windows Components and BitLocker Drive Encryption. Right click on Control Panel Setup: Enable advanced startup options and select Properties. Check Enabled and click OK.
Saturday, August 2, 2008
Thursday, July 3, 2008
Vista Secret Folder
This is not a registry hack. We are merely using the registry to discover CLSIDs (Class Identifiers).
The idea behind this tip is to create a folder which is invisible to the Vista indexer. Please be aware that the files are neither encrypted, nor hidden from anyone looking with Windows Explorer. To my mind this limitation confines the usefulness of this tip to special situations. However, from a learning point of view this tip is most instructive.
Topics for Vista's Secret Folder
Instructions to Create a Secret Folder
For your files to remain hidden, this secret folder needs a special extension .{26EE0668-A00A-44D7-9371-BEB064C98683}.
Create a normal folder, for example stuff. Now rename it with this special CLSID (Class ID) extension. For this trick to work, remember both the dot and the curly brackets.
stuff.{26EE0668-A00A-44D7-9371-BEB064C98683}
Testing your hidden files
Create a file inside your folder with the .{26EE0668-A00A-44D7-9371-BEB064C98683} extension. For example 'Guy Stuff.doc'. Now search for Guy Stuff.doc. You should get a negative result, Vista's search will ignore files in this folder.
Just in case you believe this negative result is due to slow indexing, create another document in a regular folder, search for that document. This time you should have a positive result.
There is a fancy variation of my tip using a different clsid extension. I say fancy, because it creates a Recycle Bin folder
.{645FF040-5081-101B-9F08-00AA002F954E}
Speed Start menu Search
Speed-Up Windows Vista's Start Menu SearchWhen you perform a search using the search box in the start panel, Windows Vista automatically searches the file index as well. The file index can be quite large because it includes all the files on your hard drive. One way to speed-up searching in your Start Menu applications is to narrow the scope of the search so that it does not include files on the hard drive:
Method 1: Registry Hack1.
Open registry editor using regedit.
2. Navigate to HKEY_CURRENT_USER > Software > Microsoft > Windows > CurrentVersion > Explorer and select Advanced.
3. Find and right-click on Start_SearchFiles and select Modify.
4. Set the Value to 0.
5. Restart the Explorer.exe process or reboot the computer.
Method 2: Start Button1. Right-click on the Start Button and select Properties.
2. Click on the Customize button.
3. Uncheck Search Communications.
4. Set Search Files to Don't Search for files.
5. Click OK.
Increase SATA Disk Drive Performance
You can squeeze a more performance out of your SATA hard disk drive by enabling write caching. The price though, is an increased risk for data loss/corruption should you experienced a power loss - this risk is less in a laptop because of its battery:
1. Click on the Start Button, enter Device Manager and hit Enter.
2. Expand Disk Drives.
3. Right-click on your hard disk drive and select Properties.
4. On the Policies tab, check Enable Advanced Performance.
5. Click OK and close Device Manager.
Sunday, June 29, 2008
Force Readyboost in Windows Vista
Although I have tested this with my USB without damaging it, I am in no way responsible for what happens to your removable device when testing this out. Just make sure you follow the instructions carefully. Also, expect little or no performance gain when using this on incompatible devices.
1. Plug in the device.
2. Access your device properties: Start Pearl > My Computer > Right click device > Properties > Readyboost Tab

3. Select, “Stop retesting this device when I plug it in.”
4. Unplug the device.
5. Open the registry editor: Start Pearl > Type regedit in the search bar
6. Access: HKEY_LOCAL_MACHINE / SOFTWARE / Microsoft / Windows-NT / CurrentVersion / EMDgmt
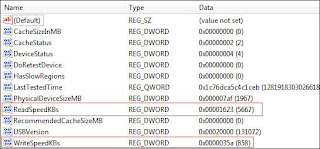
7. Make the following registry changes:
- Change the Device Status to 2.
- Change ReadSpeedKBs to 1000.
- Change WriteSpeedKBs to 1000.
 8. Plug in the device and Readyboost should work
Friday, June 27, 2008
Re-enabling hibernation in Windows Vista after disk cleanup
Windows Vista Cleanup tool, which enables you to clear your disk of unnecessary files, one of the main reason why we run out of space on C:\ partition.
After having cleanup the files I cannot see the Hibernate option in Power Options anymore.This problem occurs when the Disk Cleanup Tool disables the hibernation file. The hibernation file must be enabled to access the hybrid sleep feature and the hibernation feature in Windows Vista. When the hibernation file is disabled, and the hybrid sleep feature is enabled, a backup of open programs and open files will not be saved to the disk when you use the sleep feature in Windows Vista. Additionally, if the computer loses power while the Windows is in sleep mode, open programs and open files will not be recovered, and any unsaved work will be lost.
In order to get the Hibernate option back in the Power Options mode you should take following steps:
1. Click Start , click All Programs, and then click Accessories.
2. Right-click Command Prompt, click Run as administrator, type powercfg -h on, and then press ENTER.
The command line tool powercfg.exe enables users to control the power settings on the system. An overview of all parameters that can be passed to the cool can be found by running the command "C:\Windows\system32>powercfg /?" from the command prompt.
For the hibernation we need the following:
-HIBERNATE, -H
Usage: POWERCFG -H
After running the command above with the hibernation parameter - powercfg -h - the problem is solved and I can again hibernate my Windows Vista system. This applies to all Windows Vista editions.